Editor’s Note
Have you ever seen those beautiful walls covered in thousands of colorful roses and peonies? They are called flower wall backdrops. They are the most popular photo spots for weddings, birthdays, and even bedrooms! But if you try to rent one, it can cost more than a new iPhone. Do not worry! You can make one yourself for a very small amount of money.
In this guide, we will solve all your problems. We will teach you how to pick the best fake flowers, how to build a strong frame, and how to make sure the flowers don’t fall off during the party!
The Big Problem: High Cost vs. DIY Safety
Most people think they need real flowers for a flower wall. That is a huge mistake! Real flowers are heavy, they die in 5 hours, and they are very expensive.
The secret to a professional flower wall is using high-quality silk flowers. They look real, they are light, and you can keep them forever! Another problem is the “lean.” If you don’t build your frame correctly, the whole wall might fall on your guests. We will show you how to keep it safe and sturdy.
Step 1: Choosing Your Style (Themes for 2026)
Before you buy anything, you need to decide what your wall will look like. Here are the top trends this year:
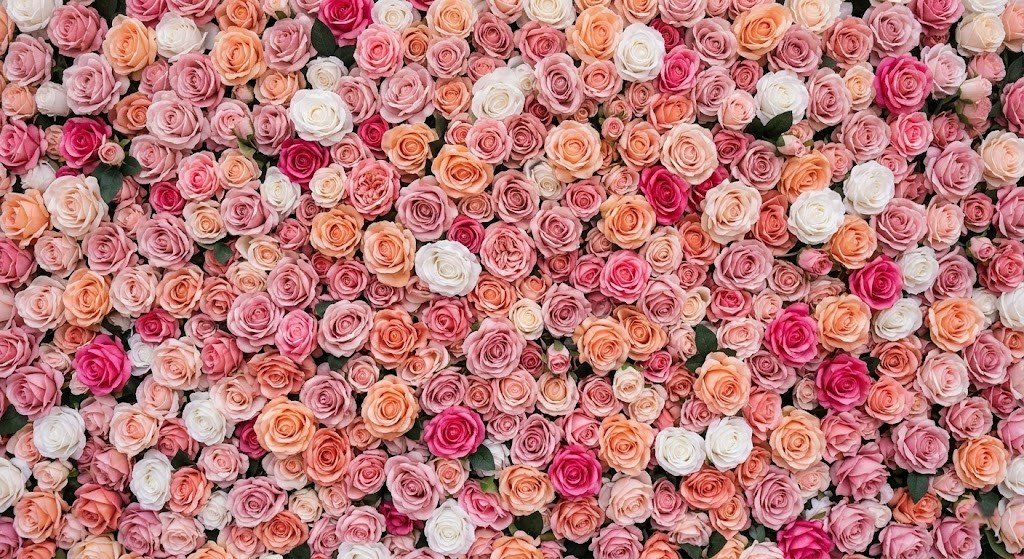
The “Blush Romance” Wall
uses soft pink, white, and cream roses. This is the most popular style for weddings and baby showers. It looks very soft and clean.
The “Tropical Jungle” Wall
mixes big green leaves (like Monstera) with bright red and orange hibiscus flowers. This is perfect for summer pool parties or a fun Graduation Party Ideas setup.
The “Boho Meadow” Wall
Instead of just roses, use “Baby’s Breath” and wild grass. This looks amazing when you place it behind a rustic Burlap table runner.

Step 2: Gathering Your Supplies (The Shopping List)
To make a standard 8ft x 8ft wall, you will need:
- Flower Mats: These are plastic grids with fake flowers already attached. You can buy them in bulk online.
- Backdrop Stand: A metal frame that looks like two poles with a bar across the top.
- Zip Ties: These tiny plastic strips are the “magic glue” that holds everything together.
- Plywood or Insulation Foam (Optional): If you want a very solid wall that doesn’t move.

Step 3: Building the Frame (Safety First!)
If you are using a metal stand, make sure to put heavy weights (like sandbags) on the bottom feet. You don’t want a gust of wind to knock your beautiful wall down!
If you are building a wall for your bedroom, you can actually staple the flower mats directly onto a piece of thin plywood and lean it against the wall. This is a great way to add an Aesthetic Room Decor vibe to your space.

Step 4: Attaching the Flowers (The Pro Way)
This is where the fun starts!
Lay it Flat: Lay your frame or foam board flat on the ground. It is 10 times easier to attach flowers on the floor than while the wall is standing.
Zip Tie Method: Take your flower mats and place them side-by-side. Use zip ties to connect the plastic grids to each other.
No Gaps: Once the mats are on the frame, stand the wall up. You might see some “bald spots” where you can see the plastic grid. Take individual flower heads and hot-glue them into those holes until the wall looks thick and fluffy.

How to Make Your Flower Wall Look “Elite”
A wall of just flowers is nice, but to make it look professional, you need layers:
Add a Neon Sign
In 2026, every flower wall needs a neon sign in the middle! Signs that say “Happy Birthday,” “Better Together,” or “Good Vibes” are very trendy. The light from the neon makes the flowers glow.
Mix the Textures
Don’t just use one type of flower. Mix big roses with tiny hydrangeas. You can even hang some Tulle Fabric on the sides of the wall to make it look like a royal stage.
Use Proper Lighting
Place two bright lights on the floor pointing up at the wall. This is called “up-lighting.” It makes the flowers look 3D and hides any small mistakes.

Where to Place Your Flower Wall?
To get the best photos, placement is everything:
- Avoid Direct Sunlight: If the sun is directly behind the wall, your photos will look dark. Place the wall facing the sun or under a shade.
- The Food Table: Place your flower wall behind your main cake table. If you have a beautiful Table Runner and elegant Goblet glasses on the table, the flower wall will make the whole setup look like a $5,000 event!
- The Entrance: Use a smaller flower wall at the door so guests can take a “Welcome” photo as soon as they arrive.

How to Store and Clean Your Wall
Since you spent time making it, you want it to last!
- Dusting: Fake flowers love to catch dust. Use a hair dryer on the “cool” setting to blow the dust off every month.
- Storage: Don’t fold the flower mats. Lay them flat in large plastic bins or hang them up in a closet.
- Fixing Flat Flowers: If your flowers get squashed in storage, use a garment steamer (the same one you use for wrinkles) to puff them back up!

Pro Designer Secrets for the Perfect Glow
Adding a flower wall is only half the job. To make it look like a professional $10,000 setup, you must focus on lighting and furniture. Never place your backdrop in a dark corner without a light source. Instead, position two Modern Candelabras on nearby side tables. The soft, flickering glow will make the artificial petals look 100% real and romantic in your photos. Also, make sure to pull your furniture at least 12 inches away from the wall. This creates a “3D depth” effect that makes your room look much larger and more luxurious on camera.

FAQs
How many flowers do I need for a full wall?
For a standard 8×8 wall, you will need about 20 to 24 flower mats (each mat is usually 15×24 inches).
Can I use real flowers for a wall?
You can, but it is very difficult. You would need “floral foam” soaked in water for every single flower. It will be very heavy and messy. Stick to silk flowers for DIY!
How do I make the wall smell nice?
Since fake flowers don’t have a scent, you can spray them with a light floral perfume or essential oils 10 minutes before the party starts!
Conclusion
A flower wall backdrop is the best way to make your party look expensive and fun. By building it yourself with silk flower mats and a sturdy frame, you save hundreds of dollars. Whether it’s a soft pink rose wall for a wedding or a bright jungle wall for a birthday, your guests will love taking photos in front of it. Remember to add a neon sign, use good lighting, and keep your flowers clean. Now, go grab some zip ties and start building your dream wall today!