Editor’s Note
Are you tired of looking at the ugly, outdated tiles in your rental kitchen? I know the feeling! When you rent an apartment, you cannot smash the tiles or change the walls because you will lose your security deposit. But what if I told you there is a secret way to get a luxury, modern kitchen for less than $50? Peel and stick backsplashes are the ultimate DIY hack. In this massive guide, I will show you the best trending designs, how to apply them, and how to take them off without your landlord ever knowing!
Introduction: Why You Need a Peel and Stick Backsplash
Living in a rental apartment usually means living with someone else’s bad taste. Kitchens and bathrooms are often the worst parts of an old apartment. You might have ugly yellow walls, dark brown tiles, or just a boring white wall behind your stove.
A kitchen backsplash is the wall area between your cabinets and your counters. It gets dirty easily from cooking oil and water. Upgrading this small area changes the entire look of the room. This is where renter-friendly peel and stick backsplash ideas save the day.
These are large stickers made of thick vinyl or gel. They look exactly like real glass, stone, or ceramic tiles, but they cost almost nothing. Best of all, they belong to the Budget Decor & DIY family, meaning you do not need any tools or messy cement to use them!
Top Renter Friendly Peel and Stick Backsplash Ideas for 2026
If you want your kitchen to look expensive and chic, you need to pick the right design. Here are the top trending styles that interior designers are loving this year.
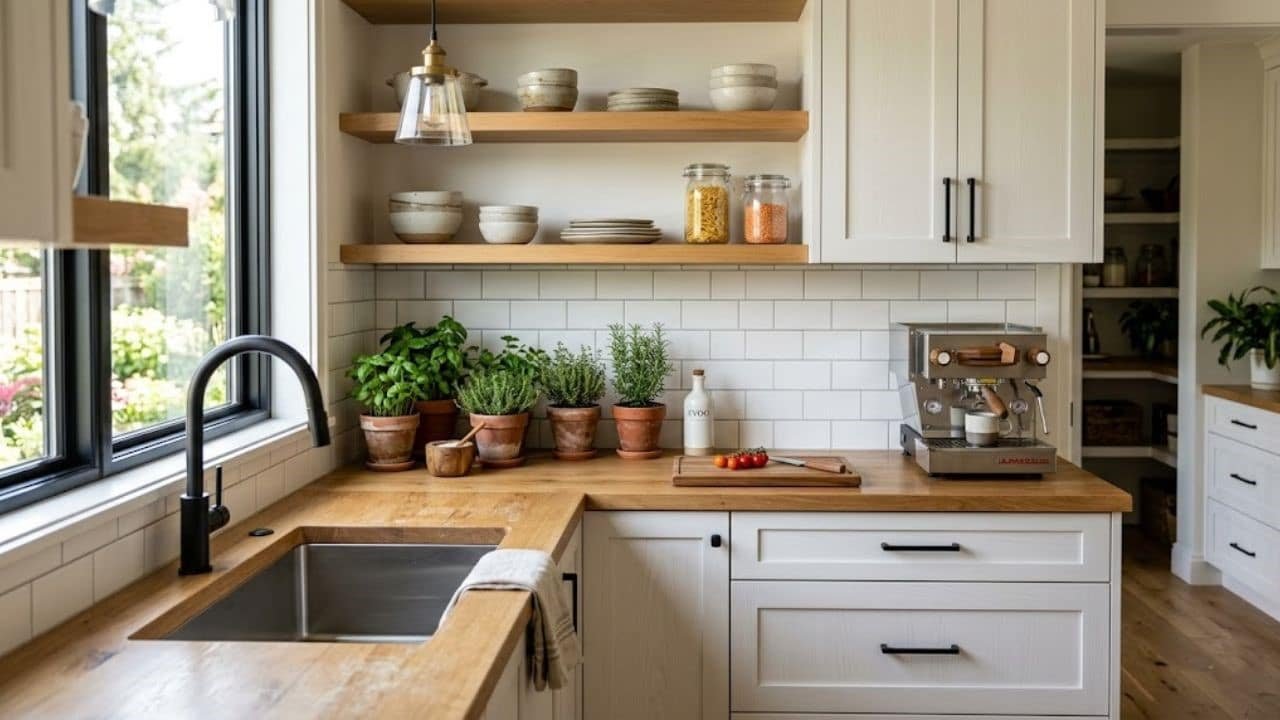
The Classic Bright White Subway Tile
White subway tile is the king of kitchen design. It never goes out of style. It looks clean, bright, and very high-end.
Why it works: If your rental kitchen is very small and dark, white subway tiles will reflect the light and make the room look twice as big.
Design Tip: Choose a white subway tile with dark grey or black “fake grout” lines. This adds a very realistic 3D shadow effect. It fits perfectly into a clean Small Space Solutions setup.
Modern Japandi Hexagon Tiles
Hexagon (six-sided) shapes are incredibly popular right now. They look very modern and geometric.
Why it works: If you love the calm, minimalist look of Japandi style, a matte black or soft beige hexagon tile is the best choice.
Design Tip: Use hexagon tiles behind a floating wooden shelf to create a beautiful, organic focus point in your kitchen.

Luxury Faux Marble & Stone
Do you dream of having a million-dollar kitchen with real Italian marble? You can fake it! Peel and stick tiles now come in amazing marble prints.
Why it works: High-quality gel tiles copy the exact veins and shine of real marble. No one will know it is a sticker until they touch it.
Design Tip: Pair a white and grey marble peel and stick backsplash with gold or brass cabinet handles. This creates an instant luxury upgrade on a tight budget.

Vintage Moroccan & Colorful Patterns
If your kitchen is totally boring and white, you need to add some drama and fun. Moroccan-style tiles have beautiful, colorful, and highly detailed patterns.
Why it works: These bold patterns hide dirt and cooking splashes extremely well. They bring a lot of energy and personality to a dead space.
Design Tip: If you use a bold pattern, keep everything else simple. Keep your countertops clear of clutter so the kitchen does not look messy.

Sleek Metallic and Brushed Steel
For a highly modern, industrial look, metallic peel and stick tiles are amazing. They look like shiny silver or brushed copper.
Why it works: These are perfect for modern apartments with stainless steel appliances (like your fridge and oven).
Design Tip: Metallic tiles are highly reflective. Use them if you want your kitchen to look like a professional chef’s cooking space.
Will Peel and Stick Tiles Damage Rental Walls? (The Big Question)
This is the most common question renters ask. Will my landlord keep my security deposit because I ruined the paint?
The short answer is: No, if you buy the right kind and remove them correctly.
Renter-friendly tiles are designed with a special, gentle adhesive (glue). It is strong enough to stick to the wall for years, but it will not eat through the paint. However, there are a few rules you must follow to be 100% safe:
Never put them on freshly painted walls: If your landlord just painted the kitchen, you must wait at least 30 days for the paint to completely dry and cure.
Avoid textured walls: These stickers work best on completely flat, smooth walls. If your wall feels like popcorn or has heavy bumps, the stickers might fall off or pull the texture down when removed.
How to Install a Peel and Stick Backsplash (Step-by-Step)
You do not need to hire a professional. You can do this entire project by yourself in just two or three hours. Here is the foolproof method.
Step 1: Deep Clean the Wall
This is the most important step! Kitchen walls are covered in invisible cooking grease. If you stick tiles on grease, they will fall off tomorrow.
- Mix warm water with dish soap or a strong degreaser spray.
- Scrub the wall behind the stove and sink very hard.
- Wipe it with clean water and let it dry completely.

Step 2: Measure and Plan
Do not just start sticking! Take a measuring tape and measure your wall.
- Figure out how many tile sheets you need.
- Use a pencil to draw a light, straight line on the wall using a level tool. This ensures your tiles will be perfectly straight, not crooked.
Step 3: Cut the Edges
Your wall will have electrical outlets (plugs) and corners. You will need to cut the sticker sheets to fit around them.
- Use a sharp utility knife (box cutter) and a metal ruler.
- Always measure twice and cut once so you do not waste any tiles.

Step 4: Peel, Align, and Stick
Now comes the fun part.
- Peel off only the top two inches of the paper backing.
- Line up the top edge of the tile with your pencil mark on the wall.
- Slowly pull the rest of the paper down while pressing the tile flat against the wall.

Step 5: Smooth Out Air Bubbles
Once the tile is on the wall, use a plastic smoother tool (or a credit card wrapped in a soft cloth) to push hard on the tile. Push from the center out to the edges to remove any trapped air bubbles.
How to Remove Peel and Stick Tiles Without Damage
When it is time to move out of your apartment, you need to leave the kitchen exactly how you found it. Do not just rip the tiles off like a band-aid! That will tear the paint.
The Hairdryer Trick: The glue behind the tiles gets soft when it is hot.
- Take a regular hair dryer and turn it to the highest heat setting.
- Hold it a few inches away from the corner of a tile for 30 to 45 seconds.
- Once the tile feels warm and soft, gently and slowly peel it away from the wall.
- If there is any sticky glue left on the wall, wipe it away with a little bit of warm soapy water or rubbing alcohol.

Conclusion
You do not have to live with an ugly kitchen just because you rent your home. Using renter friendly peel and stick backsplash ideas is the absolute smartest, cheapest, and easiest way to upgrade your space. Whether you choose classic white subway tiles or bold marble designs, this simple Budget Decor & DIY project will completely transform your home in a single afternoon. Get your tools ready, pick your favorite design, and start decorating!
FAQs
Can I put peel and stick tiles over existing real tiles?
Yes! This is actually the best way to use them. As long as your old tiles are smooth, clean, and not deeply textured, the stickers will stick perfectly right over the ugly old tiles.
Are peel and stick backsplashes heat resistant?
Most high-quality gel and vinyl tiles are heat resistant, but they are not fireproof. You should keep them at least 8 to 10 inches away from open gas flames on a stove to prevent them from melting or catching fire.
Can I use peel and stick tiles in the bathroom?
Yes, they work great in bathrooms to upgrade the sink area. However, do not use them inside the actual shower box, as constant running water will ruin the glue.
How long do peel and stick tiles last?
If you clean the wall properly before installing them, high-quality peel and stick tiles can easily last for 3 to 5 years without peeling or fading.